It is certainly no secret that lighting can tremendously improve the visual quality of a game. In this blog post I’ll describe various techniques for dynamic 2D character lighting that are very easy to implement and don’t require any additional assets (e.g. normal maps). I have successfully used these techniques in various games like Monkey Island: Special Edition, Lucidity and most recently in Broken Age.
But why is character lighting important in 2D games? Very often artists will paint lighting (and shadowing) directly into the environment artwork, which is okay because the world is generally static. In fact it would be very difficult to compute the lighting for, let’s say, a background image in real-time, since no spatial information (e.g. z-depth, normal direction) is available. Characters on the other hand move through the world and will be visible in various locations with different lighting conditions, so it is generally not possible to paint the influence of light sources directly into the sprites (or textures). Therefore the only solution is to calculate the character lighting during run-time.
The video below demonstrates how Shay (who is one of the main characters in Broken Age) looks with and without lighting. I hope you’ll agree that lighting helps to integrate Shay into (the beautiful) world.
Ambient Lighting
The idea behind ambient lighting is to make a character look like they are part of the game world rather than floating on top of it. So if, for example, a player moves from a shadowed into a fully lit area the visual appearance of the character should change from dark to bright.
Thankfully this can be achieved very easily by tinting the sprite (or texture). Using a gradient tint allows independent control of the color of the lower and upper part of the body, which makes it possible to emulate ambient occlusion between the floor and the character.
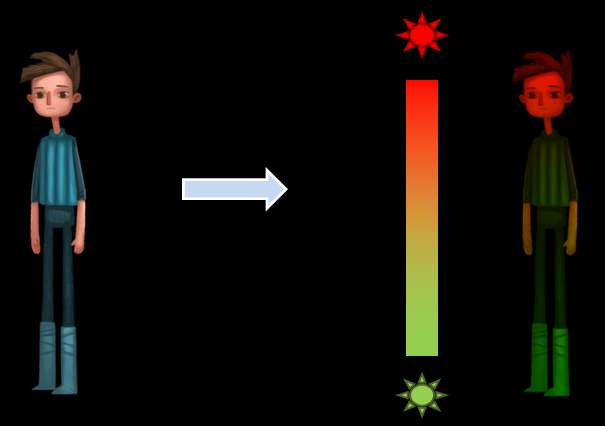
Ambient gradient tinting is the backbone of Broken Age’s lighting system and is used in every scene for every character. The following picture demonstrates how the ambient gradient changes based on the location of Shay.
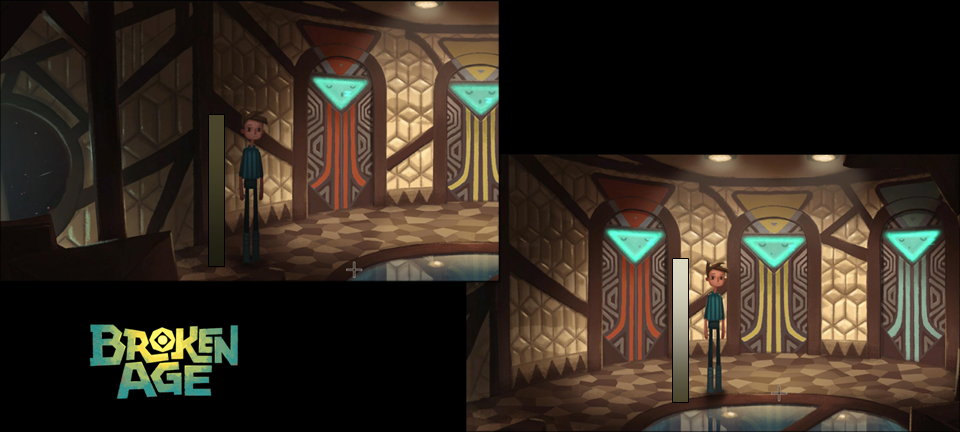
There are different ways to interpolate the gradient color across the body of a character. The simplest approach is to use the bounding box in which case vertices on the head sample from top of the gradient whereas the feet use the bottom of the gradient. This approach works great for sprite-based characters, but doesn’t offer much control over the shape of the gradient.
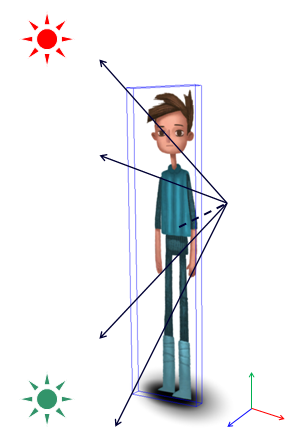
Broken Age applies a different strategy by computing normals as the vectors from the translated center of the bounding box to each vertex. The ambient gradient is then sampled based on the y-coordinate of the resulting normal. Not only does this technique work great with skinned geometry it also makes it possible to define how quickly the gradient interpolates across the body by changing the offset of the center. My GDC Europe talk ‘Broken Age’s Approach to Scalability’ contains more information about this approach, so please feel free to check it out if you want to know more about it.
Local Lighting
The goal of local lighting is to show the influence of nearby light sources. In other words it answers the questions where the characters are in relation to lights. The video of Monkey Island: Special Edition (MISE) below shows how the local lighting of the campfire illuminates the two characters. Please make sure to watch it fullscreen and in high definition.
If you look closely you’ll notice that the campfire only illuminates the parts of the characters that are facing towards it. There are different ways to achieve this look. The characters in Broken Age have hand authored normal maps that are then used to compute the reflected light. While painted normals offer a lot of artistic freedom they obviously require a lot of time to create.
In MISE we weren’t able to go down this route due to time constraints of the development schedule, so we needed a technique that required no extra assets and only a minimal amount of tweaking. Our solution utilizes a screen-space light map that contains the illumination of nearby light sources. The following image shows the light map for the lookout scene.
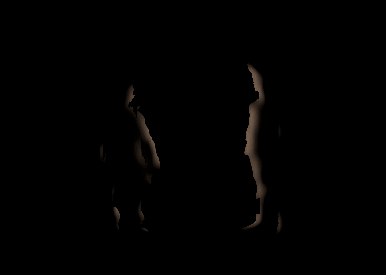
In order to calculate the light map we first render the alpha mask of the characters into an offscreen render-target (see image A below) before downsampling and blurring it using a Gaussian kernel (image B). The resulting image can be interpreted as a soft height field containing a blobby approximation of the characters. With this in place we can now compute the normals of the blob approximation as the gradient of the height field (see image C). Now that normal information is available we can finally calculate the light map by accumulating the reflected illumination from all nearby light sources (image D). In MISE we used a very simple Labertian lighting model (aka ‘n dot l’), but more a sophisticated formula can easily be used instead.
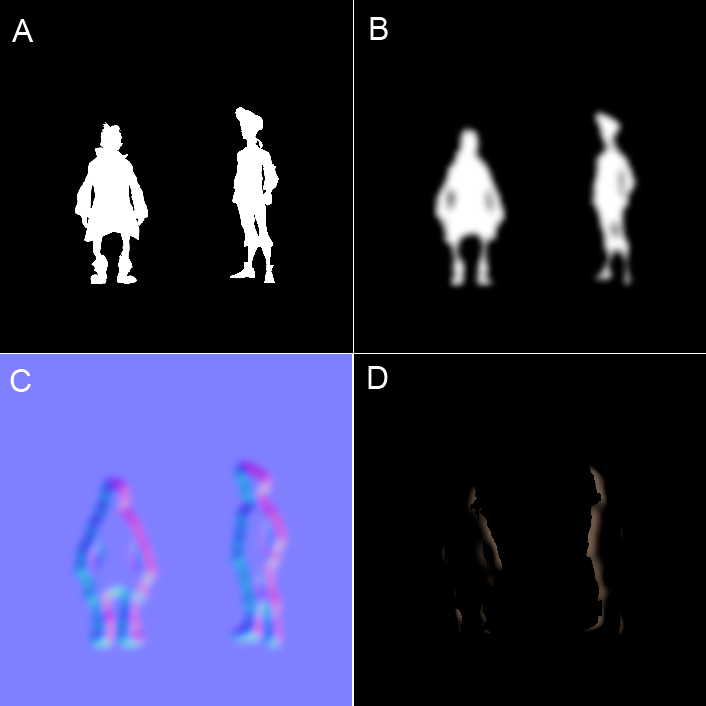
The resulting lighting data can be combined with the scene in different ways. The easiest solution is to blit the light map on top of the framebuffer using additive blending. We used this approach in MISE and it worked great, but has the disadvantage that reflected light is barely visible on bright pixels (e.g. Guybrush’s shirt).
Another compositing strategy would be to sample the illumination from the light map in the character shader. This way the light can be integrated in different ways with the texels of the sprite (or texture), so characters could effectively have varying reflectivity. In this case the light map essentially represents the results of a light pre-pass.
Light Sources
One thing I haven’t talked about up until now is how light sources are authored. It should be easy to associate different parts of the world with specific parameters in order to be able to match the character lighting with the illumination painted into the environment.
Representing light sources as radial basis functions works great for ambient as well as local lighting. The gradient tint for each character can easily be computed as the weighted average based on the distance from the light sources. In my experience it is also a good idea to expose some kind of global light, which is sampled if there are no light sources nearby. The following image illustrates the radial basis function blending for ambient gradient tints.
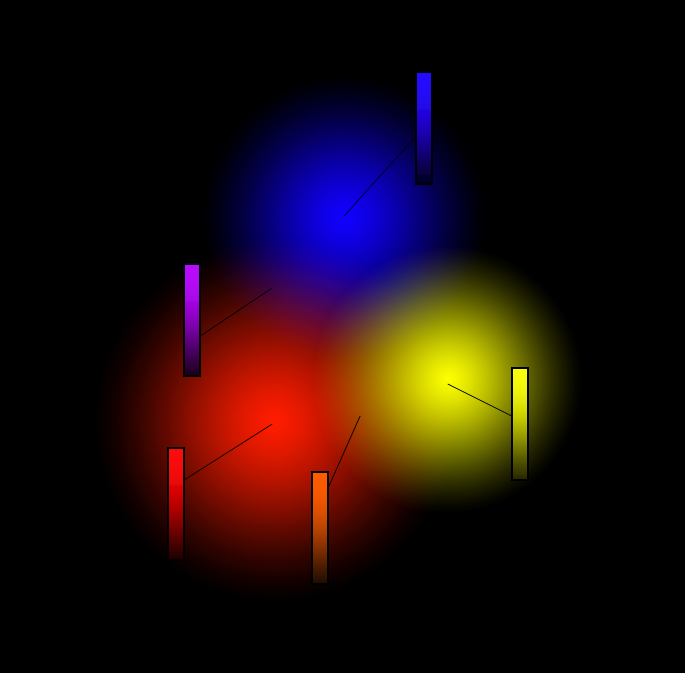
The light map can be calculated by drawing the light sources as approximated shapes (e.g. quad or circle) into the render-target. The color and intensity of each output fragment is computed by evaluating the lighting model of your choice. In MISE we calculated the reflected light basically like this:
vec l = light_pos - fragment_world_pos
vec n = tex2D(normal_map, fragment_screen_pos)
scalar nDotL = saturate(dot(normalize(l), n))
scalar dist = length(l)
vec result = light_color * nDotL / (dist * dist)
Using radial basis functions has the additional benefit that it’s very easy to animate a light source both by changing its transformation (e.g. position, scale) as well as parameters (e.g. color, intensity). A flickering campfire can easily be achieved by interpolating between two states using a (nice) noise function. Attaching this light source to the hand of a character effectively makes it a cool looking torch.
Conclusion
Dynamic character lighting helps to make a game world and its inhabitants look more believable and interesting. Thankfully it’s relatively easy to implement a lighting system that produces nice results and I hope that my blog posts could provide you with some inspiration as well as practical advice. Please feel free to post questions as comments below.
That’s it for today. The last one to leave turn off the (dynamic) lights! 🙂
PS.: I talked about this topic at Unknown Worlds’ postmortem event and you can watch the recording here: http://www.twitch.tv/naturalselection2/c/3341463